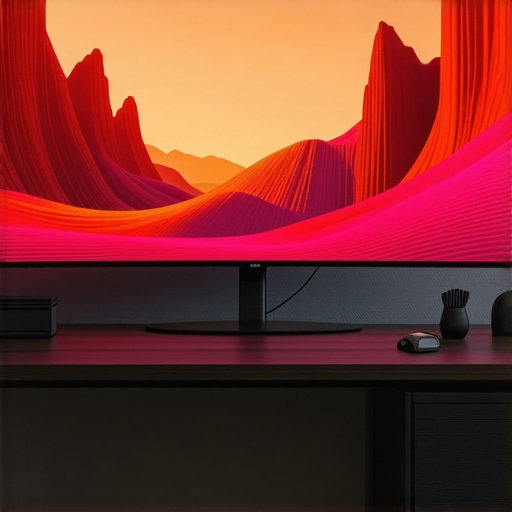
Ever sat down at your desk, excited to dive into a new project or binge your favorite series, only to be met with a cramped, cluttered screen that leaves you squinting and frustrated? I’ve been there. I remember the moment I realized my old monitor was holding me back—my neck ached, my workspace felt cluttered, and my immersion? Non-existent. It struck me how much of a difference a bigger, curved display could make, transforming my entire experience from meh to mesmerizing.
The Game-Changer in Visual Experience
Have you ever wondered if investing in an ultrawide or curved display is really worth it?
Let’s be honest—initially, I was skeptical. I worried it was just a tech gimmick, a fancy trend that would soon fade. But the truth is, I made a rookie mistake early on: I bought what looked good in reviews but didn’t consider how it would fit into my actual workflow or gaming setup. That oversight cost me time, money, and a lot of frustration. Now, I want to help you avoid that same pitfall.
In 2024, the right ultrawide or curved monitor isn’t just a luxury; it’s a game-changing tool. Whether you’re a gamer craving that wrap-around feel, a creative professional needing expansive canvas space, or someone who simply wants to enjoy movies and multitask more efficiently, the best displays can elevate your experience to new heights. And the good news? There’s a perfect fit for everyone, once you know what to look for.
In this post, I’ll guide you through the top options, what features matter most, and how to choose a display that truly immerses you. Ready to upgrade your visual world? Let’s dive in.
Pick the Right Size and Curvature for Your Space
Start by measuring your workspace and assessing how much room you have. I once rushed into buying a 34-inch ultrawide without checking my desk dimensions, only to realize it barely fit and caused clutter. Use a tape measure to determine the ideal monitor size—aim for at least 27 inches for a noticeable upgrade—and consider a curvature radius of 1800R or 1500R for immersive depth. Visualize your setup using masking tape or cardboard templates to avoid surprises.
Optimize Your Desk Setup for Comfort and Efficiency
Position your monitor so that the center is at eye level, about 20 inches away from your face. I once placed my new curved monitor too low, which strained my neck during long sessions. Use adjustable monitor stands or mounts to achieve the perfect height and angle. Ensure your keyboard and mouse are ergonomically aligned, and organize cables to prevent clutter. This simple step improves focus and reduces fatigue, making your viewing experience seamless.
Configure Settings to Maximize Immersion
Adjust your display’s refresh rate to the maximum supported—often 75Hz or higher—by accessing your system settings. I learned this the hard way when my games felt choppy until I tweaked the settings. Increase contrast and tweak brightness to match ambient lighting, creating a natural viewing environment. Enable features like Anti-Glare or Blue Light Filter if available. Fine-tuning these settings transforms your screen into a window that feels more like a window into another world.
Calibrate for Color Accuracy and Clarity
Use built-in calibration tools or software like DisplayCAL to fine-tune color profiles. I once overlooked calibration and noticed dull, washed-out images during a video project. Proper calibration ensures vibrant, true-to-life colors—crucial for creators and gamers alike. Pay attention to gamma and color temperature, aiming for a warm, natural tone. This step guarantees your visuals are crisp and immersive, whether you’re editing or gaming.
Leverage Software for Extended Multitasking
Utilize window management software like Windows Snap Assist or third-party tools to organize multiple applications effortlessly. I remember struggling with overlapping windows until I set predefined zones, making multitasking smooth and intuitive. Many ultrawide monitors support Picture-by-Picture (PbP) or Picture-in-Picture (PiP) modes—use these features to keep multiple streams visible at once. Mastering software setup maximizes your productivity and immersion, turning your monitor into a command center.
Test and Tweak for Optimal Experience
Finally, spend time testing your setup with different content—games, videos, work tasks—and tweak as needed. I initially left my settings on default and was disappointed. After some experimentation, I discovered my ideal configuration, which dramatically improved immersion. Keep notes of what works best, and revisit your settings periodically to adapt to changing needs or new content. This iterative process ensures your display remains a powerful tool for entertainment and productivity.
When it comes to ultrawide and curved displays, many enthusiasts and newcomers alike fall prey to misconceptions that can hinder their experience or lead to costly mistakes. As someone who has spent years exploring these technologies, I want to share some of the most common myths and the hidden nuances behind them. Let’s dig deeper to clarify what truly matters in choosing the perfect curved monitor.
Are All Curved Displays Better for Every Task?
This is a widespread misconception. Many assume that a curved monitor automatically enhances every activity — from gaming to professional editing. However, the reality is that the benefits of curvature are task-dependent. For creative work like photo editing or color grading, a flat panel can sometimes offer more accurate color reproduction and less distortion at the edges. Conversely, for immersive gaming or multitasking, a curved display can significantly boost your experience. The key is understanding your specific needs and selecting a curvature radius that complements your primary use case. Don’t assume that more curve equals better; instead, focus on the appropriate curvature.
The Biggest Trap: Ignoring Viewing Angles and Room Setup
One of the most common pitfalls is neglecting how your room and seating position affect the viewing experience. Many people buy a large, curved display without considering whether their desk setup aligns with the optimal viewing angles. Curved monitors are designed to provide a more natural, immersive experience when viewed head-on within a specific angle range—typically 30 to 40 degrees. If your seating position is off or the monitor is placed too far or too close, the perceived benefits diminish, and you might even experience distortion or glare. This is why properly measuring your workspace and testing your setup with masking tape or cardboard templates is crucial before making a purchase. For a comprehensive guide, check out top tips for immersive display setup.
Advanced Insight: Why Color Accuracy Often Gets Overlooked
Many users focus heavily on size, curvature, and refresh rates but forget that color accuracy can be a hidden factor affecting their experience. For professional creatives or even avid gamers who value visual fidelity, calibration is often skipped. This oversight can lead to dull, washed-out images or inaccurate color representation, which is especially problematic for content creation. The nuance here is that a high-end curved monitor with excellent specs can still fall short if not properly calibrated. Using dedicated software like DisplayCAL and paying attention to gamma and color temperature settings ensures your display truly delivers on its immersive promise. According to experts from ultimate guides on display calibration, this step is vital for maximizing visual quality.
Have you ever fallen into this trap? Let me know in the comments!
Investing in a high-quality curved monitor or ultrawide display is only half the battle won; keeping it performing optimally over time is equally crucial. Regular maintenance, the right tools, and a few best practices can extend the lifespan of your display and ensure it continues to deliver that immersive experience you cherish. In this post, I’ll share exactly how I keep my setup in top shape, along with the tools I recommend for every step of the way.
Why Regular Cleaning Is Non-Negotiable
Dust, fingerprints, and smudges can degrade image quality and cause overheating if left unchecked. I swear by using a microfiber cloth—preferably lint-free—and a gentle screen cleaner formulated for electronics. Avoid harsh chemicals like ammonia or alcohol, which can damage the screen’s coating. A quick weekly wipe-down keeps my display spotless and functioning flawlessly. For stubborn spots, a mixture of distilled water and a few drops of isopropyl alcohol applied sparingly works wonders. Remember, gentle is key.
Tools That Make Maintenance Easier
I highly recommend investing in a dedicated monitor cleaning kit, which typically includes microfiber cloths, anti-static brushes, and screen-safe cleaning solutions. For ongoing calibration, I use software like DisplayCAL. This open-source tool helps me fine-tune color accuracy periodically—vital if you’re into creative work or gaming where visual fidelity matters. Additionally, a USB-powered dust blower is invaluable for cleaning vents and hard-to-reach areas without risking damage.
How do I maintain calibration over time?
Color drift can occur as displays age, leading to duller images or inaccurate hues. To combat this, I schedule calibration sessions every few months. My preferred method involves a hardware calibrator like the X-Rite i1Display Pro. It’s a bit of an investment but pays off by ensuring your colors stay true, especially if you do professional editing or enjoy immersive gaming. Coupled with software like DisplayCAL, it makes the process straightforward and precise. Regular calibration guarantees that your display continues to impress, maintaining that immersive quality you initially enjoyed.
How do I troubleshoot and repair minor issues?
If you notice flickering, dead pixels, or color inconsistencies, first try updating your graphics drivers—often, software updates fix underlying issues. For hardware glitches, running built-in diagnostics, if available, can help identify the problem early. I’ve used tools like HWInfo to monitor system health and temperature, preventing overheating that could damage internal components. If problems persist, consulting the manufacturer’s support or warranty service is the safest route. Catching issues early saves you money and preserves your display’s longevity.
The Future of Display Maintenance
As technology advances, I predict that displays will become even more self-maintaining, incorporating features like automatic calibration and self-cleaning coatings. Additionally, AI-driven diagnostics may alert users to potential issues before they become noticeable. For now, sticking with proven tools and regular upkeep is the best way to keep your immersive setup running smoothly. I encourage you to try out a hardware calibrator if you haven’t already—your visuals will thank you!
Stay proactive with your maintenance routine, and your investment in a curved or ultrawide display will reward you with years of stunning visuals and immersive experiences. For more tips on setting up and maintaining your display, check out our comprehensive guide.
If you’ve ever felt that your new curved monitor doesn’t quite deliver the immersive experience you imagined, you’re not alone. The truth is, the magic of a curved display isn’t just in the hardware—it’s in how you set it up and calibrate it for your unique space. Over the years, I’ve learned that the real breakthrough comes from understanding the subtle lessons that most beginners overlook, turning a good monitor into a game-changing centerpiece of your workspace or entertainment zone.
The Hardest Lesson I Learned About Curved Monitors
One of my biggest eye-opening moments was realizing that the *angle* at which you view your monitor is just as important as the monitor’s curvature itself. I once placed my ultra-wide curved display slightly off-center, which resulted in distorted visuals and eye strain. It was a lightbulb moment that made me revisit my entire setup. Now, I always test different seating positions, using simple masking tape to visualize the optimal viewing angles before making any purchase. The right placement can make or break your immersive experience.
Why Calibration Is the Hidden Key to Visual Mastery
Many users focus on size and curvature but forget that calibration is crucial for true color accuracy and clarity. I initially skipped calibration, assuming factory settings were enough. But after trying professional calibration tools like DisplayCAL, I discovered vibrant, true-to-life colors that brought my content to life. Whether gaming, editing, or watching movies, proper calibration ensures your display’s potential is fully unlocked, making every pixel count.
Room and Lighting Matter More Than You Think
It’s tempting to buy the biggest, curved monitor and call it a day, but the room environment plays a vital role. Glare, ambient light, and even the shape of your desk can affect how immersive your experience feels. I learned this the hard way when reflections ruined my viewing pleasure. Now, I prioritize controlling ambient light and positioning my monitor to minimize glare, creating a natural, comfortable viewing environment that enhances immersion without straining your eyes.
My Favorite Resources for Curved Display Mastery
Over the years, I’ve curated a toolkit of trusted resources that help me maintain and optimize my display setup. For calibration, I rely on DisplayCAL, a fantastic open-source software that makes color calibration accessible. For learning about the latest monitor tech, I follow ultimate guides that break down complex specs into actionable tips. Lastly, I keep myself updated with reviews from trusted tech sites to stay ahead of the curve.
Your Next Step Toward Immersive Mastery
Getting the most out of your curved monitor isn’t just about hardware—it’s about intentional setup, calibration, and environment optimization. I encourage you to experiment with your space, calibrate your display regularly, and stay informed through trusted resources. These small but impactful steps will elevate your viewing experience, transforming your monitor from a simple screen into a portal of immersion and productivity. Are you ready to take your display setup to the next level? Share your own tips or challenges below—I’d love to hear your journey towards immersive viewing!